What is Bitter Vetch?
What's Vicia ervilia and is it the same as what's sold here?
No! There are two plants that go by the name "Bitter Vetch". One of which is Vicia ervilia which is a plant of southern Mediterranean and north Africa origin and is widely recognised as a Neolithic starter crop. Due to its drought resistant qualities it is still grown as a forage crop in these areas today. It produces pods, each containing four seeds shaped like a grape seed and about the size of a grapefruit pip, that ripen in the late summer. By comparison the Heath Pea produces seeds in the early summer that are spherical, no more than 2-3mm in diameter and hence not a seed one would seek to harvest for food. Having harvested Heath Pea seeds for the last 5 years I can assure you that the physical effort required to gather even the smallest volume is massively disproportionate to the food value gathered. We grow the second version called, Lathyrus Linifolius which forms tubers which we desire for their properites.
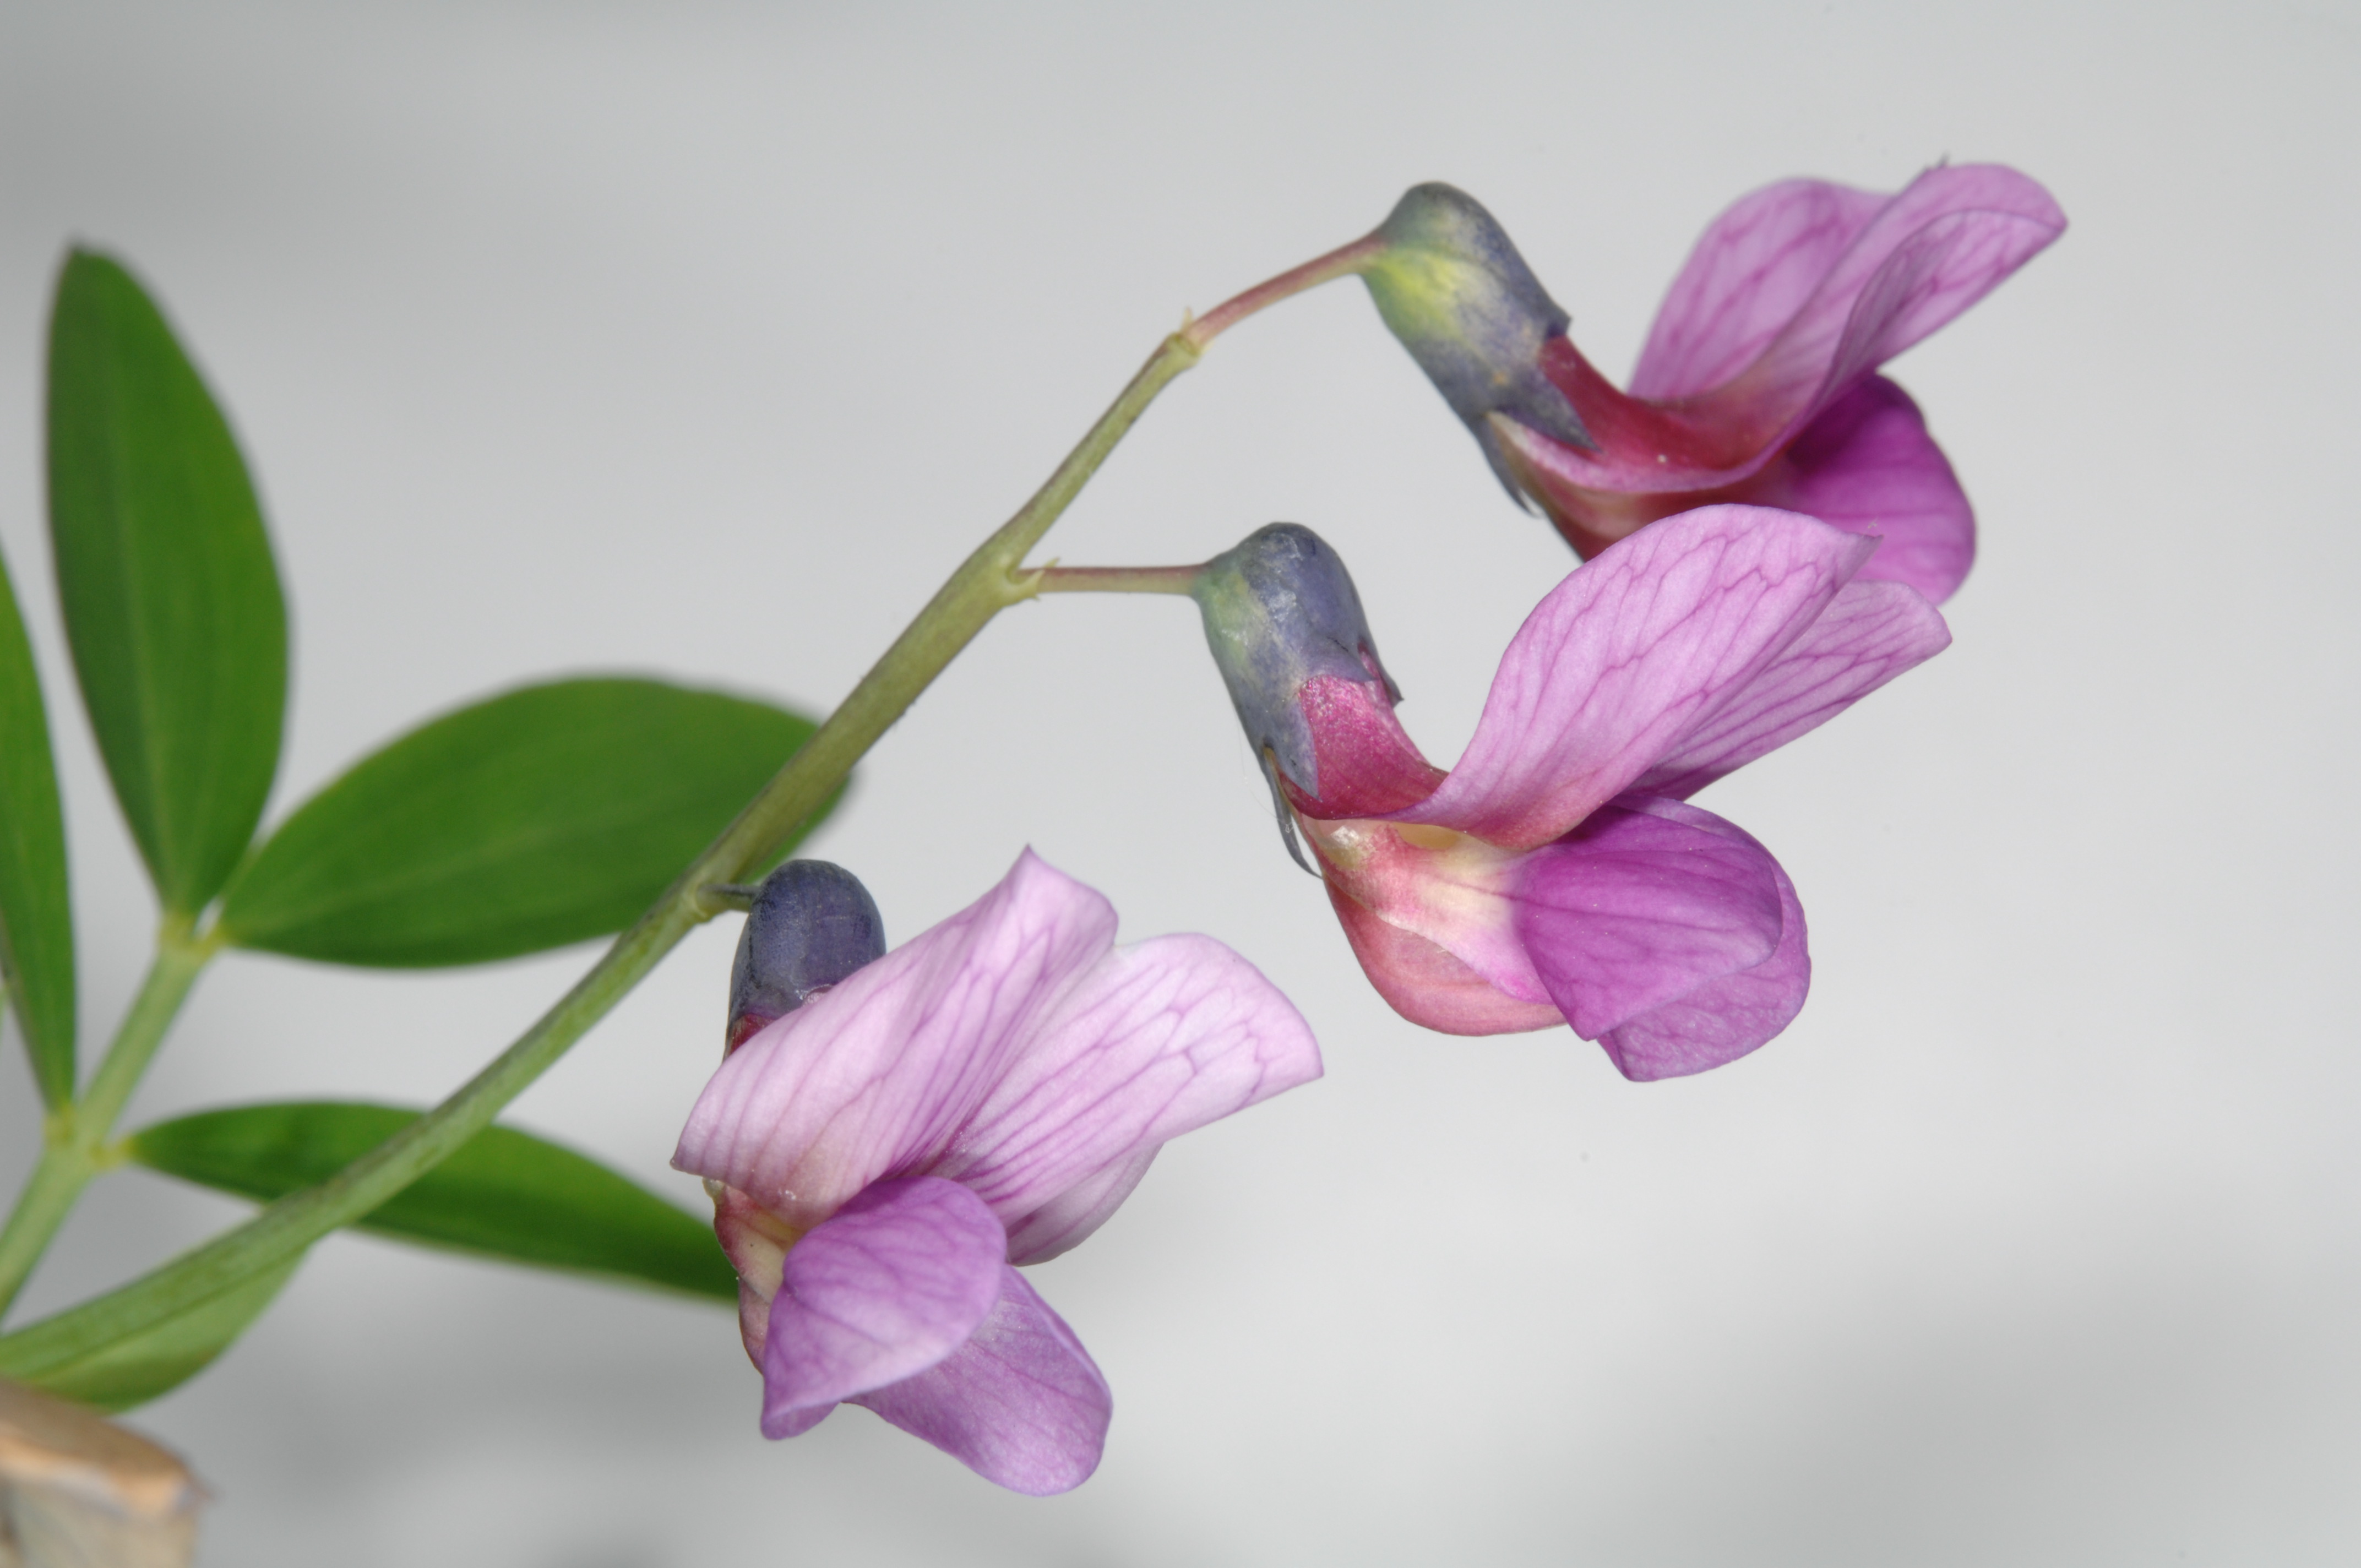
A Bitter Vetch plant
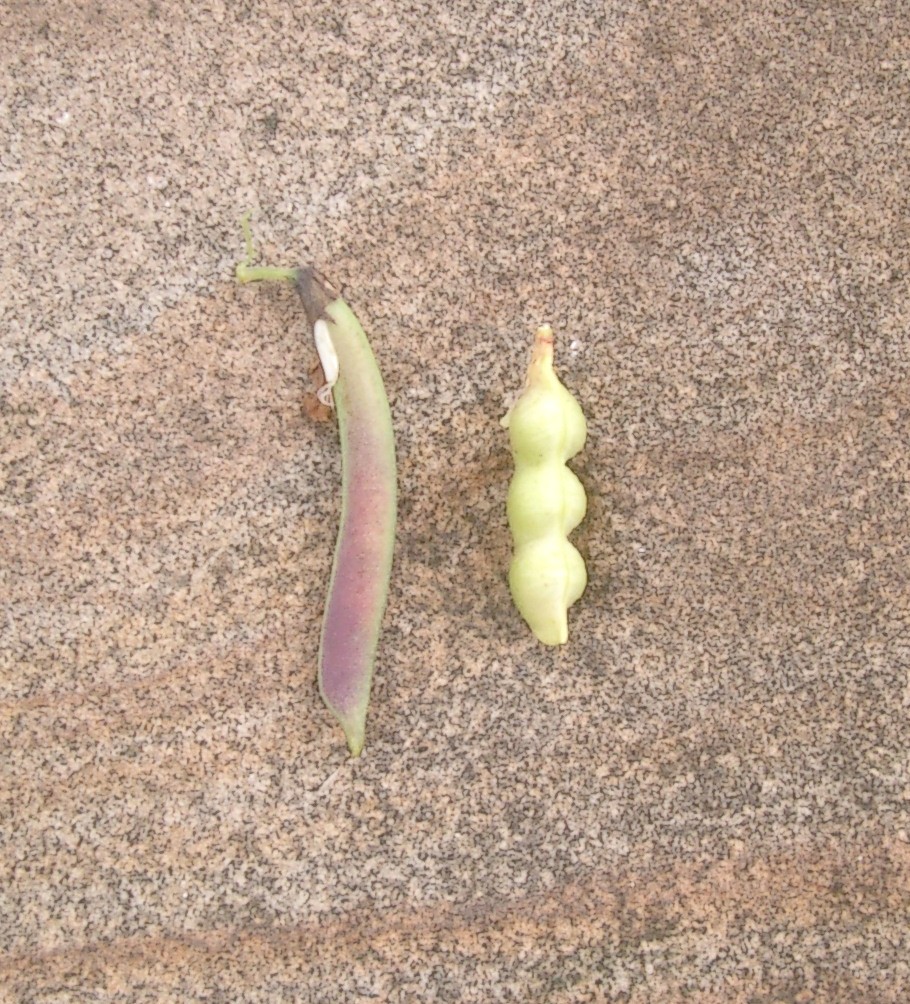
Lathyrus Linifolius (L), Vicia Ervilia (R).
Help with growing Bitter Vetch
What type of soil should I use
Start the seeds in fresh, sterile seed compost and where possible plant the seedlings in well drained loamy soil. The plants are quite tolerant of different soil types but they do not thrive in clay as they don't like having their feet wet all the time.
When is the best time to plant Bitter Vetch?
It is a member of the pea family so a good reference point is to look up growing instructions for Sweet Peas in your part of the world. Generally, they will get off to a good start in the spring if the seeds are planted in the autumn in an unheated greenhouse or the windowsill of a porch, protected from frost and the seedlings then planted out once the danger of frost has passed. That said I've had seedlings appear at all times of the year so there are no hard and fast rules.
Can I grow Bitter Vetch in pots?
Yes. I carry out all my selective breeding programmes using plants that are in pots. The pots should be as broad and deep as possible as the lateral shoots that come from the tubers need space to spread and they are deep rooted. The advantage of pots is that they can be moved about so you can experiment to see which spot suits them best in terms of light and shade.
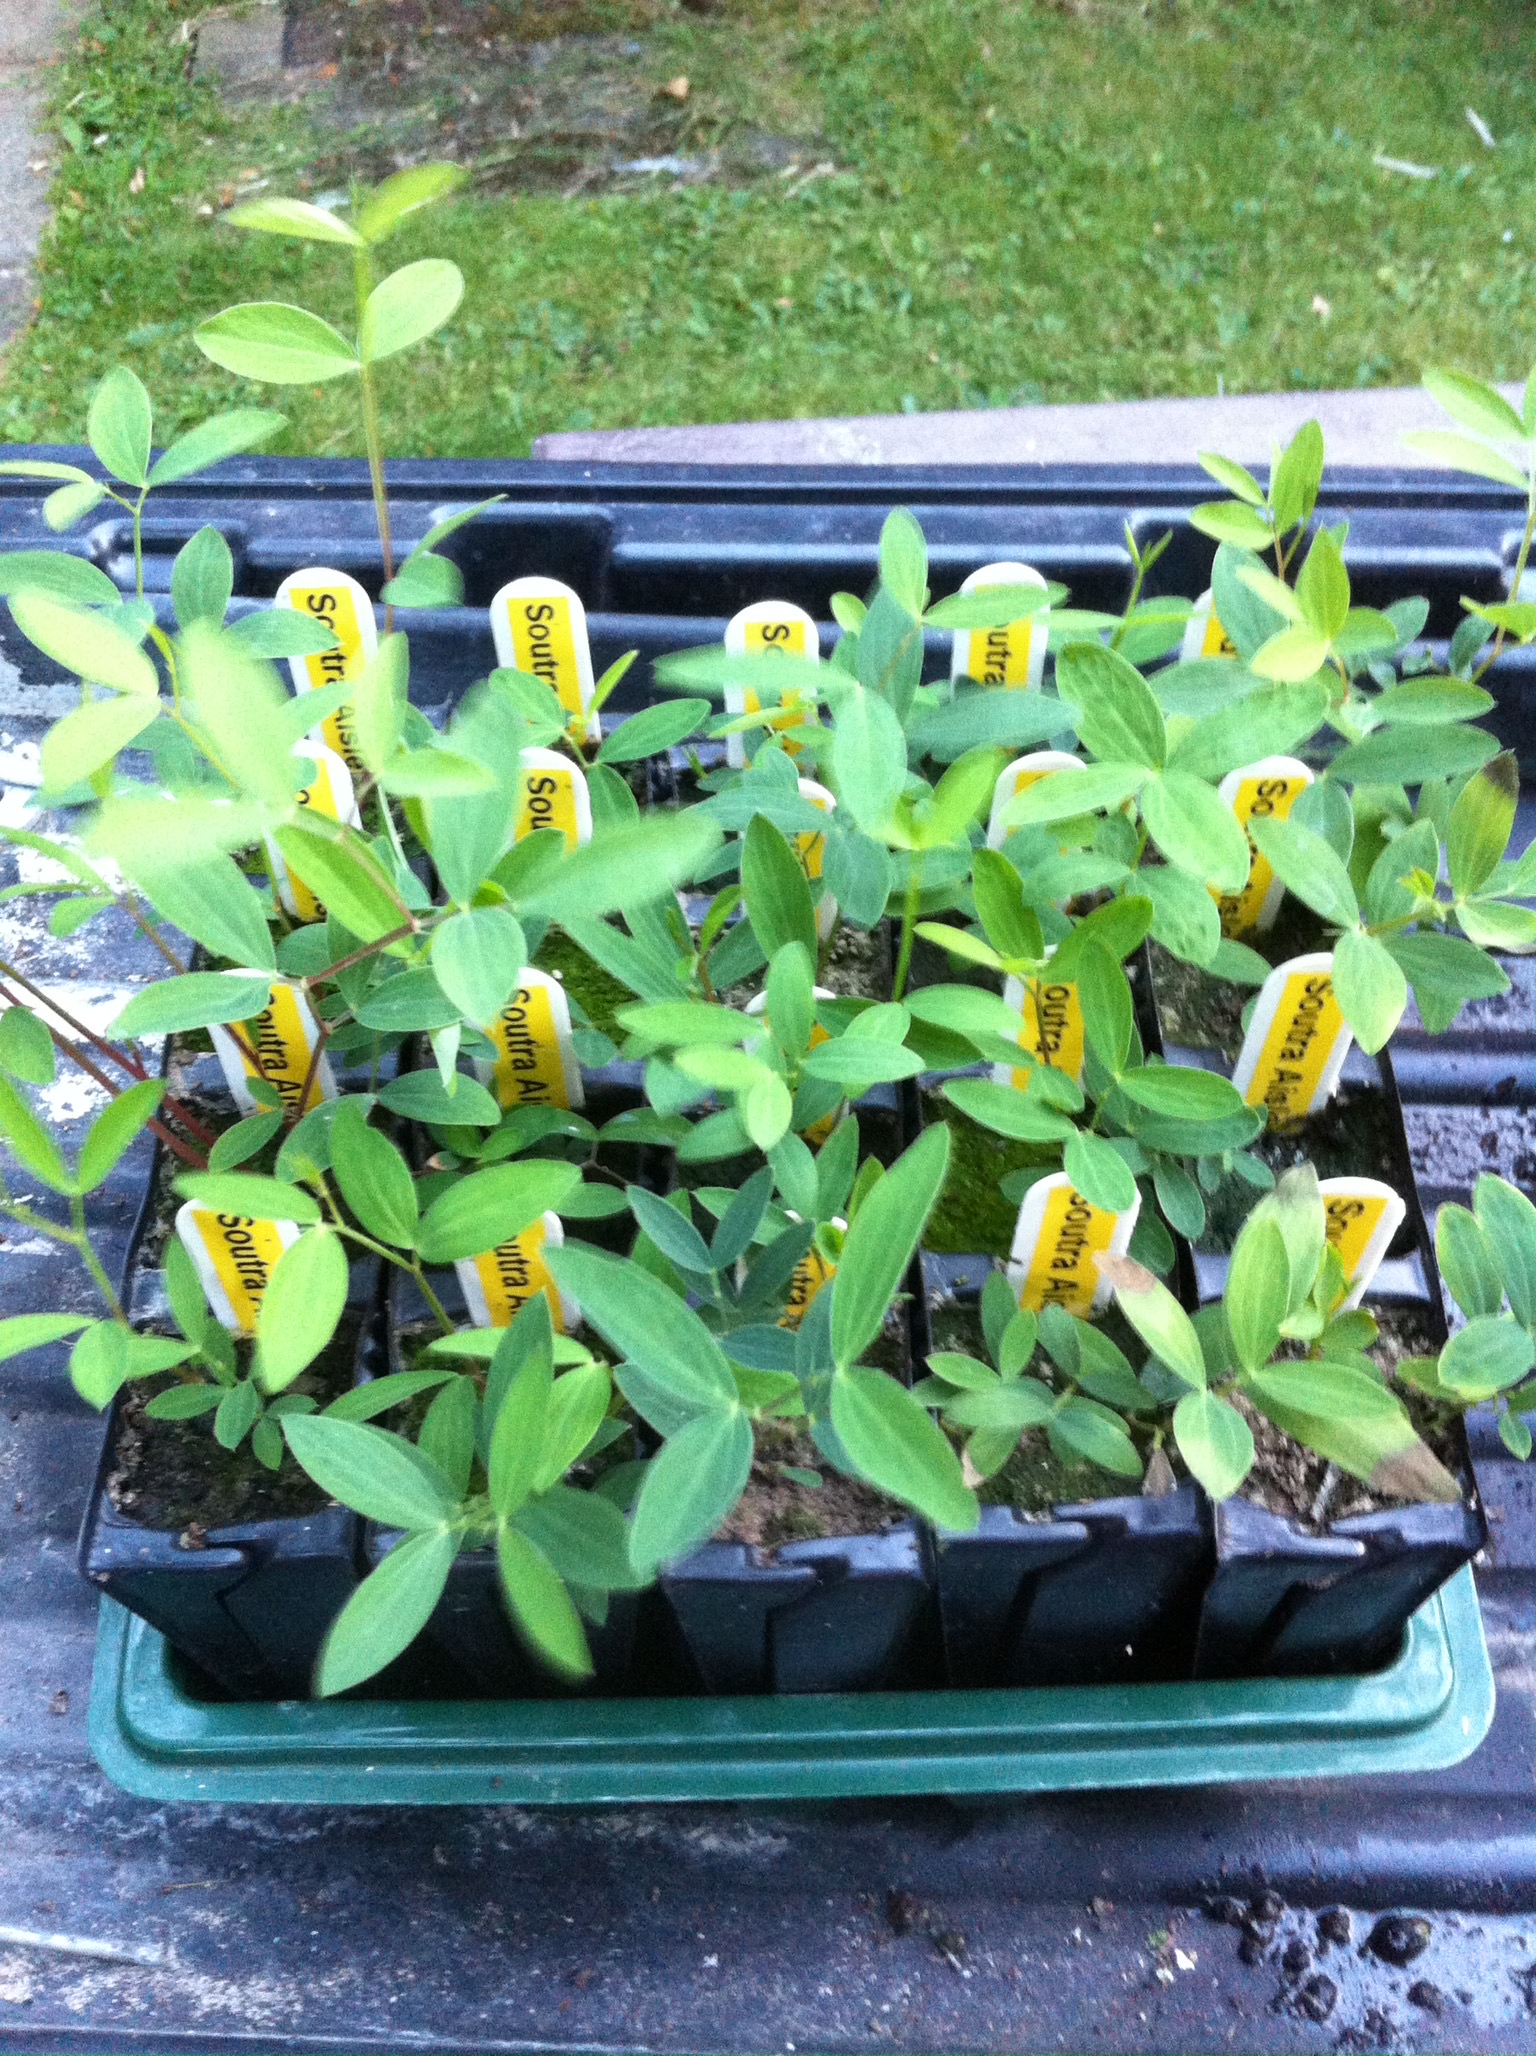
A Bitter Vetch plant in a pot
Are the plants affected by any pests?
Touch wood, in the UK nothing appears to touch them - I like to think that any insect that might be tempted has a bite and then finds its' no longer hungry! Some early growth can get a touch of greenfly but these soon vanish when the predators such as ladybirds arrive on the scene (see section on seedlings). I do use an occasional watering of nematodes as these tiny predators hunt through the soil and eat most nasties that might cause a problem.
I don't have green fingers, what should I be wary of?
The two biggest killers of any plant are over watering and starting seeds in garden soil or old compost.
Few plants like to sit in waterlogged soil for any length of time as it drowns their roots - the trick my grandfather taught me is to touch the top of the soil and see if particles of soil stick to the finger, if they do the compost is damp enough, if they don't then water them but allow the excess to drain away.
Old compost or soil that hasn't been sterilised is to be avoided at all costs as it can harbour nasties that attack the seedlings before they've had a chance. The one I would particularly warn against is the Fungus Gnat as these are often present in house plants and old compost - the small black, adult insects fly around plants and are harmless but they lay their eggs in compost and the tiny, black-headed maggots that emerge, normally eat organic matter in the soil, but give them a chance and they will devour young roots and kill seedlings. They are particularly troublesome in over-damp soil so make sure you apply the finger test. If you get them a dose of nematodes in the water will help bring them under control (if they haven't already done too much damage) and removing the top layer of compost and replacing it with gravel may help. Better to avoid them in the first place by using sterile compost and keeping them damp, not waterlogged, and, if possible, away from other house plants.
When can I expect my first crop of tubers?
If the plants have been looked after you can expect a crop in the second autumn following their first spring.
Do I kill the plants when I harvest the tubers?
No. The main tuber forms at the centre of the plant but radial shoots that grow in the land where the wind doesn't blow (underground) fork and with time this fork will thicken up and become a tuber from which leaves and roots will form in the following season. If you dig the plants up these smaller tubers can be replanted. Alternatively, scrape away the soil from the central tuber and cut around it with a knife and then twist and pull it from the ground - this avoids disturbing the roots of the smaller tubers and gets them off to a better start.
What weight can I expect from my plants?
A recent crop produced tubers that ranged in weight from 12-48gms with the smaller ones being satellite tubers. Next time I harvest I plan to keep back the larger tubers and replant these in a remote breeding bed in an experiment to produce a strain of highly productive seeds - it might work, time will tell, but even if it doesn't its great fun trying.
I'm toying with starting my seeds in peat pellets. What do you think?
They're okay but....they dry out quickly and the seedling soon outgrow them, so you need to be ready to plant them on when they need more space - like any living thing they will tolerate setbacks but the less they have the more they will thrive. Peat is better than coir as coir doesn't hold nutrient so the plants soon begin to go backwards.
I used to start all my seeds in peat pellets but the biggest problem comes later. The peat is wrapped in a casing of man made fibre which doesn't rot so as the tuber develops the casing gets tangled up in the shoots and can constrict the development of the lateral shoots. Verdict. I no longer use them and avoid them if you can.
Do I need to hand pollinate?
Once your plants begin to flower (April-June) - you may get a few in the first year but generally this will be the second year - they attract bees but do take the time to watch them as some types of bee will bite through the sepal to get at the nectar within. Unfortunately, this doesn't pollinate as they need to be going in through the front door. If you find this or don't get visited by bees then an artists brush inserted into the flower and gently twiddled should do the trick - the flowers are quite short lived so you'll need to do this once they emerge.
How many seeds can I expect from each plant?
This very much depends on the weather when the plants are flowering - the window for pollination is short and if the weather is keeping the bees at home then the flowers will be barren. The good news is that in this case the flower won't invest any energy in developing an empty seed pod and these will fall with the flower.
I've harvested pods with 12 seeds crammed in but I've also harvested them with a single seed. As a rule I would expect a running average of 4-6 seeds per pod.
When do I harvest the seeds?
Pay attention at the back as this is important! The pods emerge from the flowers a pinky red colour and then turn pale green as they develop. As the seeds ripen you will see the seam along the length of the pod begin to blacken. When this happens you need to be vigilant because leave them too long and the whole pod will turn black and then suddenly spring open with the two halves spiralling back on themselves to scatter the seeds far and wide. In damp weather these black pods are slow to burst but if the weather suddenly turns dry they will all go off in unison. As a rule of thumb pick when the seam blackens as it is better to pick a few pods too early than none too late.
Do the pods all ripen at once?
No. Flowers will keep coming through the season so you will find yourself picking ripe pods from bracts that also have flowers and unripe pods on them. Also there tends to be a flush of growth when the plants are setting seeds so be prepared to hunt through the foliage as the early pods soon get hidden from view.
How hardy are the plants?
Like all plants, the better they are cared for the better they will reward you. However, Bitter Vetch is remarkably forgiving. Some years ago I had a row of pots which were flooded by a leaking gutter and then hit by three weeks of bitterly cold weather - the pots having been flooded from above turned into solid blocks of ice and I fully expected to have lost the plants. Come the spring they came back as before. Similarly, I have seen whole plants die off during a prolonged drought but once the rain returned they sprang back to life. The tuber holds the plants vitality so in extreme conditions like these, life shrinks back into it but its better to avoid setting them back in such a dramatic fashion if you can as regrowth is using energy that would otherwise be put into developing tubers.
They are a perennial plant so they keep on coming back year after year, but one thing you will notice is that as they get older the foliage moves away from the centre as the smaller satellite tubers develop on the radial shoots - the central tuber keeps increasing in size but produces less foliage.
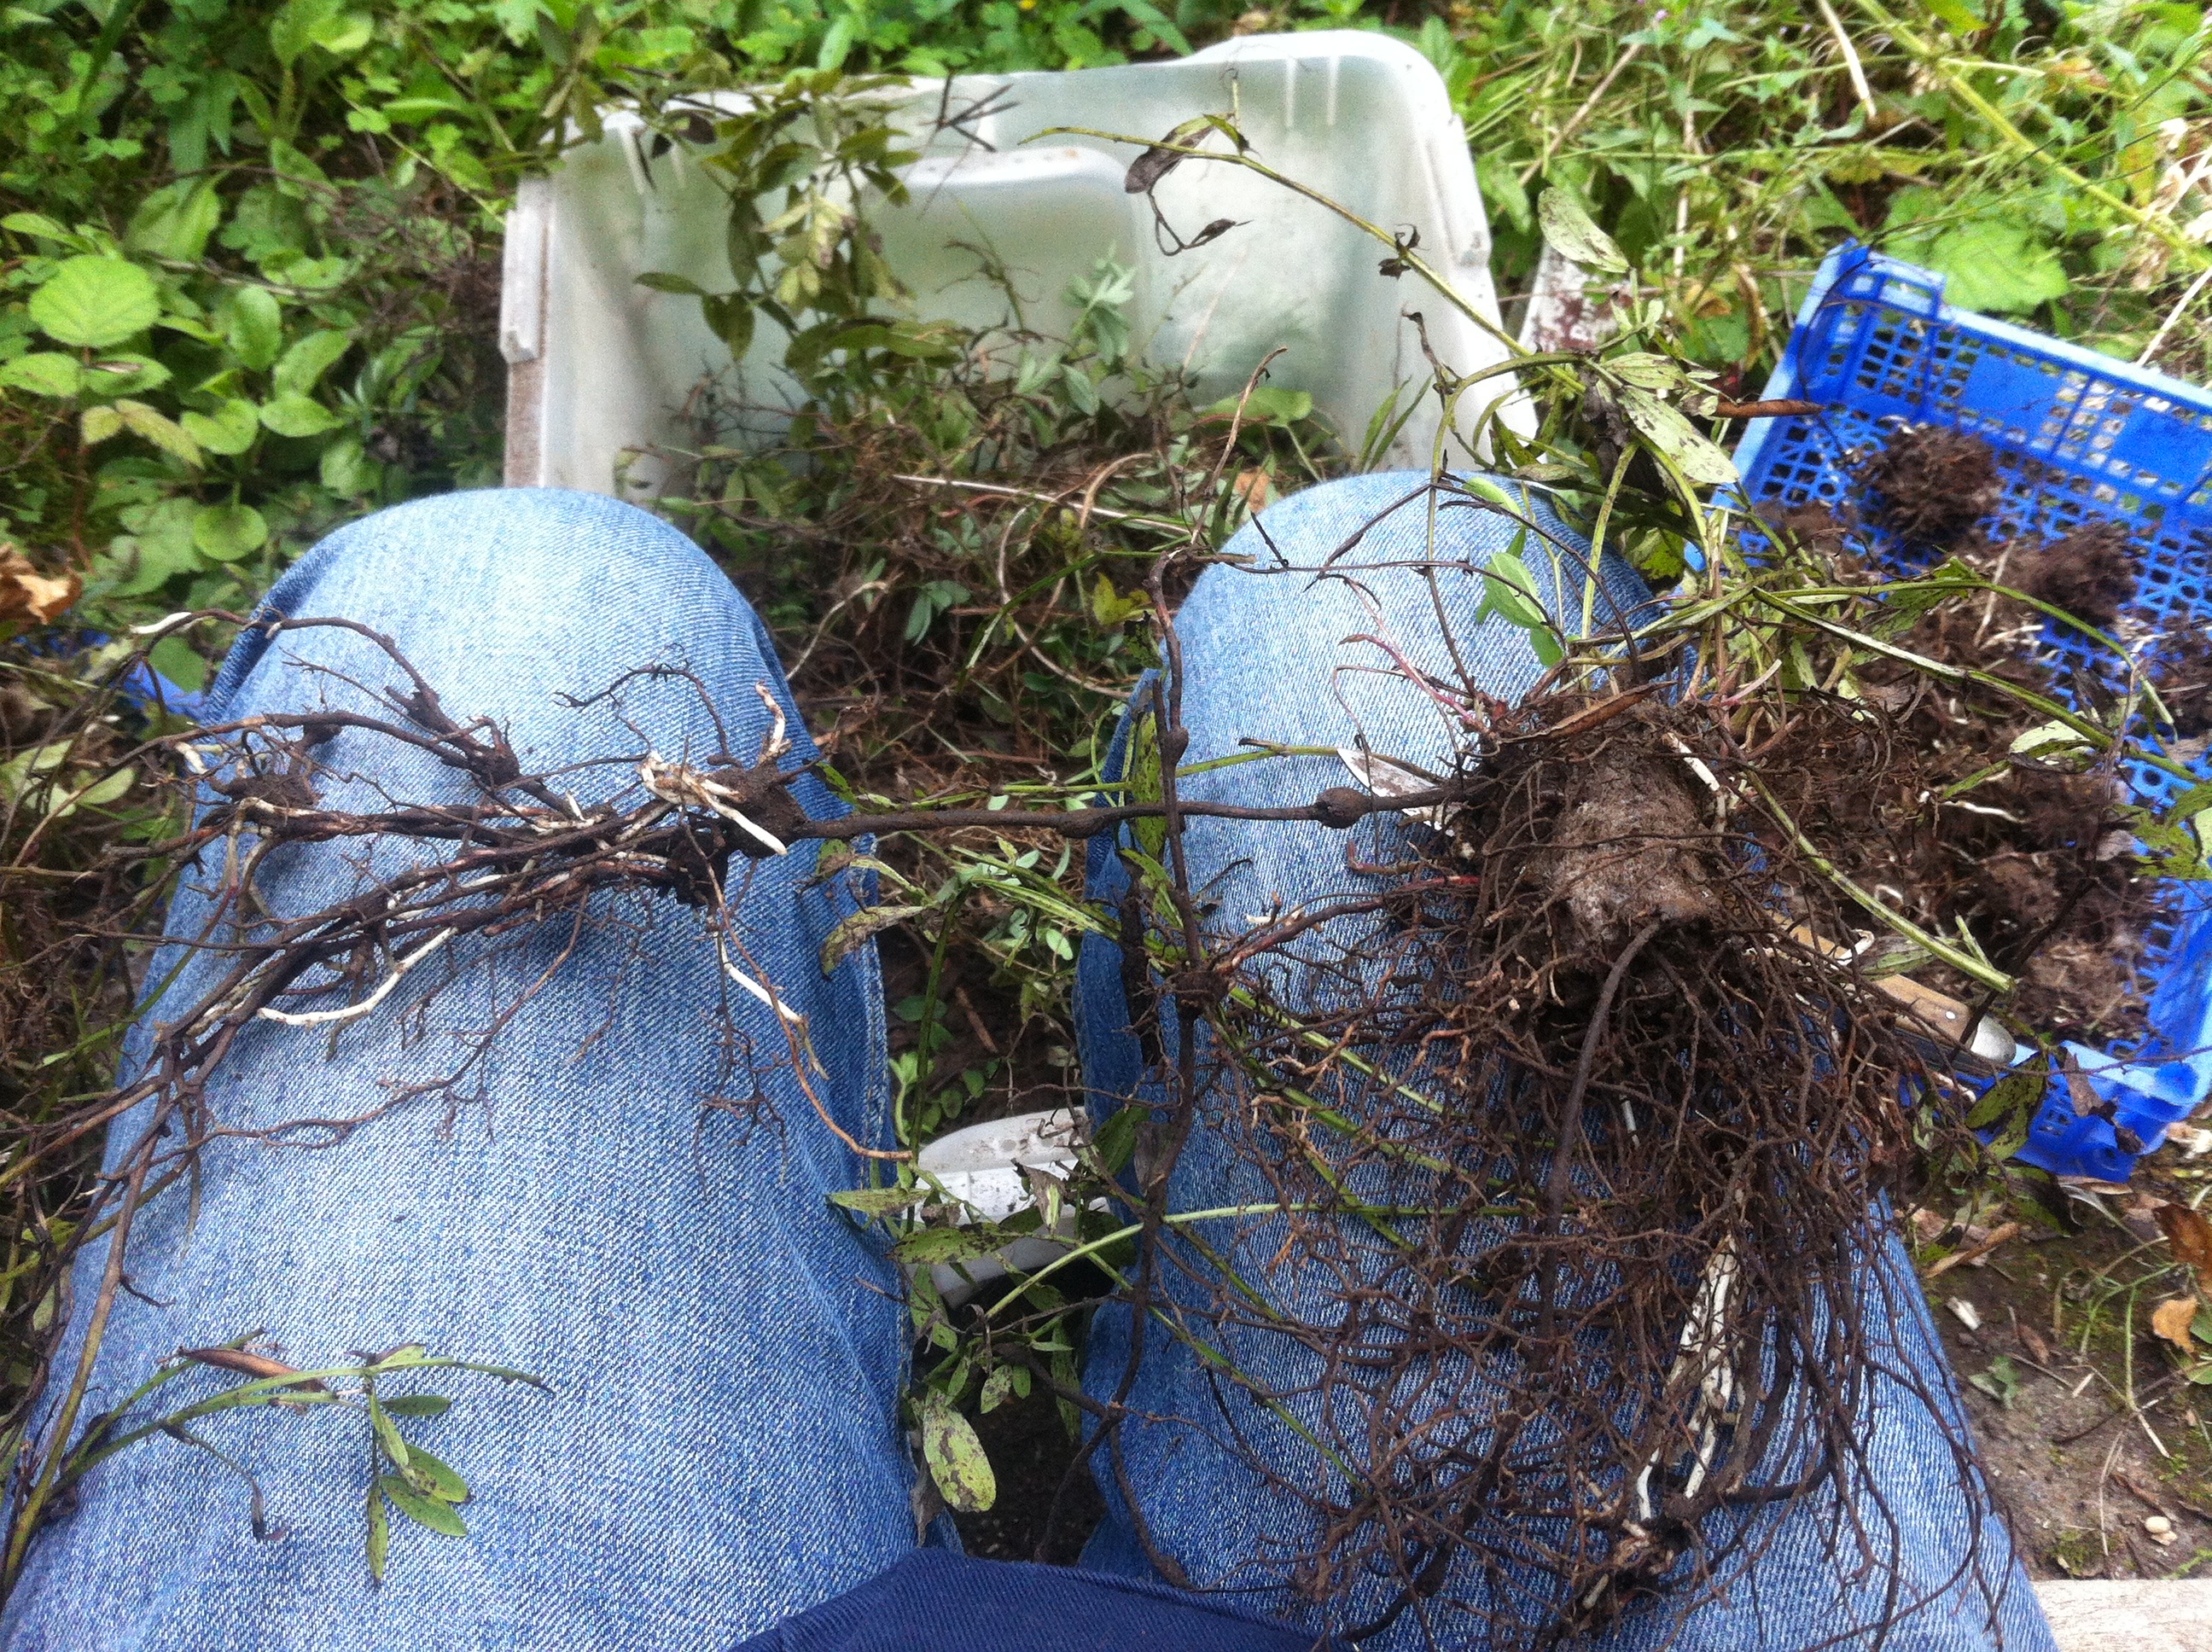
The main tuber with satellite tubers coming off
What soil type is best?
Avoid clay like the plague as this is the one soil type they don't cope with, otherwise they seem to thrive particularly well in a loamy well drained soil.
What spacing should I use when planting out my seedlings?
If using pots, one central plant in as big a pot as you can. In an open plot I put mine in rows twelve inches apart and twelve inches between plants. This works for me but there is room to experiment to find better spacing - I would suggest that if you are planting a plot leave a wider avenue between each double row of plants as you'll need space to go up and down the rows when collecting the seeds.
The plants are quite slow to get established and there is a danger they will get smothered by weeds in the early stages if you aren't vigilant. I overcome this by digging and levelling the plot in the autumn and covering it with a woven black water permeable membrane - this warms up the soil in the spring and stops the weeds growing. Then when I'm ready to plant out I use a cook's blowtorch to melt a hole into which I plant my seedling - if you use this technique do make sure the membrane is touching the soil otherwise it will catch fire. I then leave the membrane in place until the plants are well established and then carefully lift it off. You might also at this point consider mulching between the plants with chopped bark to keep up the battle against the weeds.
Do you use any fertiliser?
I grow all my plants organically as I believe chemicals harm wildlife and if you get the balance right you are rewarded by things such as the robin that sits on my foot and demands to be fed. Nonetheless, any soil will become exhausted over time so you need to keep feeding it. In plant pots a good technique is to regularly replace and replenish the top few inches of soil. In the spring and autumn I dress my plots with volcanic rock dust and a liberal quantity of organic chicken manure which keeps everything ticking along nicely. Because different nutrients are used by the foliage (nitrogen), roots (phosphates) and seeds (potash) there is room to experiment to see if adjusting these levels increases production in any way. Over to you.
Any other tips?
Because the plants are only a few inches tall, picking the seeds is a back breaking task. If I was starting from fresh and had the space I would seriously consider using raised beds as it makes things marginally less painful.
The adoption scheme
Will I have anything else to pay?
No. The adoption rate includes all the costs of production and postage. If I subsequently find that I have overlooked charges from the cost of production then I will carry them and they will not be passed on to existing adopters.
Can I pay in instalments?
Not at present - for the foreseeable future I wish to avoid the inevitable hassle and admin of chasing people who's payments have ceased midway - I've run charity membership departments in the past and the grief involved in following up lapsed payments is not something I'm keen to engage in again if I can possibly avoid it!
Why does it become more expensive if I adopt later in the year?
Putting the exclusive introductory offering to existing customers aside, the simplest answer is that adoptions in a tight timeframe mean greater efficiency as my time and labours would be in distinct phases - sowing, hand watering seedlings, potting on, etc. If I encourage adoptions at any time by using a fixed price I would find myself juggling potting on with having to sow and care for seedlings alongside my normal seed harvesting. Finally, I grow the plants organically and there are certain pests such as the Scariad Fly which are harmless to established plants but which can decimate seedlings. I control the flies with nematodes but lots of plants at different stages of growth would increase risk as well as the time required to care for the plants of the late adopters.
Another reason to discourage late adoptions is that the longer a plant is in the ground the larger the tubers it will produce and as the scheme is a "pooled" adoption I don't want the early adopters penalised by latecomers.
What happens if the plants I adopt fail to prosper?
For your protection you are forward buying the tubers from ten plants rather than adopting ten specific plants. How the scheme works is that if ten people each adopt ten plants then, when the tubers are harvested each person will receive 10% of the total crop. Pooling the crop in this way is fairer for everyone and minimises individual risk.
What protection do I have?
Growing plants organically in the open is not without risk, however, based on my experience and past results I am confident I can supply a minimum of 200g harvested tuber weight per ten plants. Historically I have harvested tubers ranging from 10g through to 50g with a running average tuber weight of 21g so I'm not making any forecasts with crossed fingers and hope for a fair wind.
As added protection and at my own risk, I will grow two plants for each plant adopted and should the harvest from the adopted plants fall below the forecast 200g per 10 plants then sufficient of these will be harvested to achieve the minimum 200g/10 plants.
In case it isn't clear, should the adopted plants produce a harvest in excess of 200g then that excess belongs to the adopter. On this note, for a number of years now I have been retaining the seed from larger tubers in an attempt to increase yield, however, as yet, I don't have any measurement of the success or otherwise of this experiment and cannot therefore factor it into the offering.
What dry yield might I expect?
Air drying on a wire rack reduces the harvested tuber weight by a factor of 64%, hence 200g once sliced and dried would result in 72g of dried tuber. There may be some variance in this as, to ensure optimum tuber quality and a minimum delay between harvesting and despatch, the tubers will be dried in a moving air food dryer which might effect the net weight. All packs will display both the harvested and dried weight.
Will you keep me informed of progress?
All adopters will receive a certificate by post showing the number of plants adopted and a complimentary pack of 25 seeds. I will also publish a monthly newsletter on Facebook - for anyone who advises me they don't use Facebook will receive a copy by email. You are of course more than welcome to contact me by email at any time.
Can I visit?
I am keen to discourage visitors as the location of my nursery is secret. As the published findings from recent research show bitter vetch has huge potential and I believe it is important to protect the time, energy and love I've invested in understanding and cultivating this plant. Furthermore, by offering the adoption scheme I am morally obliged to protect your investment and the fewer people who know of its whereabouts, the less the risk of theft or vandalism.
When will I receive my tubers?
As a rule of thumb tubers are ready to harvest the second Autumn (Fall) after planting so you'll need to be patient. Left any longer and they begin to loose condition and show no appreciable increase in weight. Therefore anyone adopting plants in March, April or May should expect to receive their share of the harvest in the October/November of the following year.
From experience a small tuber will have formed by the first Autumn, however, these are small and weigh in at 2-4g (at best) so harvesting at this weight is akin to chopping down the apple tree to pick the first apple! I make no promises but if the main crop is on track then I may harvest each adopter a sample tuber from the reserve crop so you can see what to expect.
Caveat
The plants are grown organically which, more often than not, means that pest and weed control are by hand and historically, this has been sufficient to keep the crop safe (in every way). Should I encounter a problem likely to dramatically affect your tuber production and the only means of safeguarding your investment is to resort to non-organic means of control then I will seek your views before resorting to any non-organic action. This may mean segregating elements of the crop and a diminished yield for any untreated plants but the important point I wish to stress is that no non-organic treatment will be used without your knowledge.
Help with the tubers and seeds
How do I prepare the tubers?
If you are using them to propagate then you can cut larger tubers into pieces and plant these, alternatively the smaller developing satellite tubers can be planted in a similar way. I've had some success with planting on the radial shoots but haven't experimented with this enough to comment with any authority.
If you plan to dry the tubers then trim off all the excess foliage and roots and wash carefully with a stiff brush - they get quite knobbly so soil can get trapped as lumps and bumps develop. Then with a sharp knife cut them into slices about 3mm and lay then on a clean surface to dry. They dry out very quickly so if yours are a bit "stuck" move them to somewhere warmer. Once dry I store mine in a container along with a sachet of silica gel - I don't think this is absolutely necessary but its better to be safe.
What do the tubers taste like?
Fresh from the ground they have the crunch of a raw potato and a sweet liquorice taste. Dried they keep the taste but become leathery and reduce down to a small wad of fibre when chewed. The odd thing about the sweet taste is that you experience it at the back of the tongue rather than the tip, where you normally taste sweetness, and this lingers in the mouth for some time. I've also steeped some in 50% proof vodka, it flavours the spirit quite pleasantly and turns it the colour of whiskey - I can't comment on whether the appetite suppressing qualities pass to the liquor because I'm not a spirit drinker and don't plan on starting. Historical references say it is meant to sharpen the mind when taken with drink so there's an experiment for someone to undertake!!
How do I store my seeds?
Split the pod when you pick it (its also a useful way of judging the right time to pick) and remove the seeds - if you leave them in the pods these will turn hard and it make it an unpleasant task. If time means you have to leave this till later make sure you put a loose fitting lid on the pot so any moisture can escape but also because some pods will burst and fire the seeds out - I've been hit on the nose at twenty feet by a stray seed!
The seeds are quick drying and you'll find some seeds look like tiny plump apples and others are small and round because they've already dried out in the pod. Spread all the seeds out (one seed deep) on a flat tray and put it somewhere cool and dry. Once they are dry put them in marked envelopes and for best results store them on a shelf in the refrigerator until needed.
Is there any variation in the seeds?
Unripe seeds are usually bright green and will look like a deflated ball when dry and should be discarded. Ripe seeds when first picked come in a variety of colours from rosy red through to mottled green and black (like a blackbirds egg) and all colours in between. Once dry they will shrink to a sphere about 2-3mm in size and their colours will fade. If you have picked pods that contained lots of seeds then these can be misshapen but this doesn't affect their viability.
As a footnote I'm running a couple of experimental plots to see if the different coloured seeds produce different results i.e more seeds, bigger tubers, etc but it will be some time before these produce any meaningful results, if at all.